Watercolor

I’ve decided to dip my toe in the intriguing world of watercolor. It is one of the most unpredictable mediums. You just never know how the paint will react with the water you have to use to move it around. (Click on images to enlarge them.)

My first painting was done using Sennelier’s Honey Based l’Aquarelle watercolors. It’s just a loose sketch that I made by laying a few colors on dampened paper. When I got the first two pink shapes, they reminded me of angel wings. So I gave it a soft, muted “body” and surrounded it with the sky. The title was written with Golden High-Flow acrylic paint in black and was applied with a fine line applicator.

4-2-15 Soar

My second painting was done over a page that already had the green design on it from cleaning off a stencil. I stamped Dina Wakley’s “Scribbly Birds” stamps onto the page. I painted the entire spread with Kuretake’s Gansai Tambi watercolors from Japan. I added some branches for the birdies to stand on, as well as a loose sky.To my eye, it looks like there is a separate tree on each page. But that could just be me!

 4-3-15 Blue Bird Trio

I really enjoyed painting these. Between the angel that was hiding in my journal and my three blue birds of happiness, I think I am going to enjoy adding this medium to my art repertoire.

My Personal Journal

I’ve been working a lot in my personal journal lately. The one I made with the pink, turquoise and purple Gelli print cover. I love when I just start playing and it turns into a finished page! Some of them are the result of several days of “puttering” and others were done all at once. There are no rules in art journaling, which is why I love it so much. Here are a few of my recent pages. (click on images to enlarge)

1-22-15 Magick is something you make

This page has LOTS of layers. I started with a really bright Gelli print. I toned it down with some gesso then added some stamping and washi tape. Then more gesso. Finger-painted some subtle color before stamping Dina Wakley‘s girl three times, as well as one of her handwritten quote stamps. The girls got dresses to match the background and I added the flower for some dimension. I love how all of the layers subtly peek through and make you want to try to figure out what’s under there!

1-26-15 inspired by Andrea Walford

This page was inspired by one of Andrea Walford’s “Art Journal Express” YouTube videos. The background is simply pink paint through a Stencil Girl Products stencil with washi tape over it. I stamped the Unity Stamp girl on some white paper, colored in the flower in her hair and mounted the white paper onto some pink card. I added the quote that came with the girl and, “Voila!”…another journal page is complete!

1-28-15 Free Spirit

I started this page with a fleur-des-lis stencil using fluorescent pink paint. Wow! Once I chose this black and white image of a flapper, I knew I had to tone it down. Gesso to the rescue! Then I used some pearlescent watercolors around the stencil design. After I attached the photo, I tinted her a bit with colored pencils. I colored the peacock feathers with GellyRoll pens and a bit of gold watercolor. I stamped the Free Spirit sentiment and outlined the letters to make them stand out a bit more.

I hope you enjoyed looking at these pages as much as I enjoyed making them. Thanks for stopping by!

Documented Life Project

I am doing the Documented Life Project again this year. (For more information on this, go to the Art to the 5th site.) This year, instead of using a Moleskine Planner, they are using the large Ranger Dylusions journal. I’m using the smaller Dylusions journal because I’ve been working large for a while and want a bit of a challenge. I like swapping around now and then. For the cover, I decided that I wanted to make something similar to the cover I just painted on last year’s final journal. (which you can see in my January 9 post) After all, that one is just going to go up on a shelf. If I wanted to be able to enjoy the design longer, it just made sense to try to do it again! It isn’t exactly the same. That’s not really possible…or desired. I just enjoyed getting the same “look” as the other journal. (click on photos to enlarge)

Cover front

For the month of January, the theme is “The Blank Page and How to Face it.”. Each week suggests a way to get the pages started. There is also a prompt each week, which is sometimes a quote that we can choose to use or not. The interpretation of all of the prompts is always up to each artist. To get you caught up, here are my first three weeks of pages.

Week One – Book Paper

I glued down a layer of pages from an old book, some old music sheets, and other miscellaneous papers. This gave me a base to start my layout. I used a quote I loved on the right side. On the rest of the layout, I added various shapes punched out of gelli prints. They reminded me of bubbles, confetti, and party hats. After all, we were celebrating the beginning of a new year! On the far left, I included my word of the year…breathe.

Week 1

Week Two – Gesso

For this layout, I started with a layer of gesso, which is a primer. After it was totally dry, I added a couple of different blue acrylic paints, blending them on the page. Before the paint dried, I laid down a couple of different dragonfly stencils and wiped away the paint with a baby wipe. I painted the flower for a little interest and added some iridescent paint to the dragonflies’ wings. All that was left was to write the quote with my new favorite calligraphy pen and I called it done. Simple and effective!

Week 2

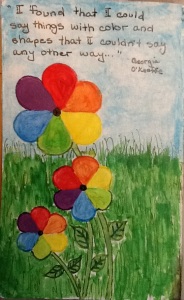
Week Three – The Color Wheel

I LOVE making color wheels! It’s the art geek in me. There is just something very satisfying about mixing two different colors and producing a third color. It’s like magic! I figured that since flowers are made up of all of the colors in the color wheel, why not make flowers that ARE the color wheel?!?!?! Besides, our quote is by Georgia O’Keeffe, one of the most beloved floral artists of our time.

Week 3

I hope you enjoyed your peek into my DLP journal. It’s a project that I totally enjoyed last year and am sure to have fun with again in 2015.

Happy Mail

In several of my art groups, many of us participate in what we call Happy Mail. It can take several forms. Sometimes it might be a handmade postcard being sent to someone in the group. Other times it might be a few things from someone’s “stash” of ephemera…book pages, sheet music, decorative papers, tags, etc. There might also be little things that the sender has made or painted. Whatever it is, it is always appreciated. It’s a wonderful surprise and they always seem to come on a day when the receiver really needs a little pick-me-up.

For this page, I painted the background with blue and green Gelatos. Then I reached into my bag of Happy Mail and started looking through the envelopes. I pulled out things that went with my color scheme and with each other. I’m very happy with how it came out. I hope you like it, too.  (click on image to enlarge)

1-15-15 Happy Mail

I’d like to dedicate this post to all of my wonderful artist friends who have generously sent me some Happy Mail. I always cherish it and it always makes my day. Thank you.

Better Late Than Never!

I finally painted the cover of my last art journal of 2014. Sometimes I wait until the journal is filled to paint the cover so that it won’t get “dirty” as I work in it. If the journal’s cover is decorated as I make it, I will generally make some sort of cover for it. Usually I will use freezer wrap because it’s nice and sturdy. I’ve been thinking of switching to clear vinyl so that I can enjoy my cover as I work in the journal. But I digress…

The background is a soft blending of lavender and blue violet. Then I went at it with my texture tools…bubble wrap (of course! Isn’t that, like, a law?!?!?), some of my foam stamps, the end of a cardboard tube, a Catalyst blade, the end of a paintbrush. One of my new favorites is a Fineline Precision Applicator. That’s how I got those cool white squiggles. It’s basically just a bottle with a long, fine tip on it. You can make all sorts of fine marks and even write with it. Thanks, Dina Wakley, for introducing me to this awesome tool!!!!

Here’s how my cover came out. It’s lying open, flat on the table. It’s made with floor cloth canvas and designed to go around the pages, then there’s a flap that comes around to the front. (click on photos to enlarge)

1-9--15 Back of last journal of 2014

I also took some photos of my work surface after I finished painting. The paper underneath the journal will eventually end up in my art. I’d never waste all of that painty goodness! I couldn’t get it all in one shot (without climbing on a chair and risking a fall…I’m not willing to sacrifice my neck, even for the sake of art), so I took pix of each side.

Left side

1-9-15 Work Area after painting journal cover - left side

Right side

1-9-15 Work Area after painting journal cover - right side

I had a great time painting this today. It gives me a sense of accomplishment, especially since it helps wrap up last year’s project. And I have painty hands, which always makes me happy!

Stamps

Today has been one of my “hang out in my recliner” days. I’m still surrounded by art supplies (because I have some in almost every room of the house) so I know that I can still be a productive member of the art community.  😉 One of the projects I’ve been having fun with is making stamps. Carving them out of rubber material is fun but my coordination isn’t the best today and I don’t want to have a gouge “incident.” (I already cut myself with my new scissors today. Yes, those new ones are nice and sharp!!) So I pulled out the tub of self-adhesive foam shapes that I found in the kids’ area of my local craft store. There are circles, squares, triangles, etc. I also had some sheets of foam to use for my bases. All that I had to do was adhere the shapes in a pleasing pattern onto the thicker base foam. I’ve also used foam-core board for the backing when I want a firmer stamp. Here’s what the stamps look like:    (click on images to enlarge)

Foam stamps 1-4-15

To test them out, I stamped most of them in my new journal. Then I played with the designs with markers and pens, just to see what I can do with them. They will work well in my journals as well as with my Gelli plate.

1-4-14 Foam Stamps

That was fun! Give it a try. Before you know it, you’ll have quite a stash of stamps. And they can be made from the comfort of your favorite chair!

Breathe

In many of my art groups, we each pick a Word of the Year. It’s not a resolution. It’s more something to aspire to, maybe something we are working on or need to remind ourselves. Last year my word was Fearless. While I didn’t make as much progress with that as I had hoped, I still made SOME progress. And that’s what it’s all about. No pressure. Just a little nudge or reminder.

This year my word is Breathe. It’s to remind me to relax and stop worrying so much. It’s become a bit of a mantra for me, dating back to my decorative painting days. I used to take a weekly class in decorative painting. During class, I’d frequently hear my long-suffering teacher saying, “Raine…breathe.” It turns out that I had a tendency to hold my breath while I was painting…especially fine details. After a while, the students decided to help out  and, sure enough, after a while one of them would say, “Raine…breathe.” And we’d all laugh. (Which got me breathing!)

So the word has deep seated meaning for me. It reminds me not only to literally breathe, but to relax more. I need to learn to enjoy the process and relax into it, rather than focusing on what the finished piece looks like. I need to let go of perfectionism. After all, that’s just a trap. There is no “perfect” anything! As long as I’m having fun, that’s what matters.

Here’s the first page in my new journal. I played with a new calligraphy pen to write my word, accenting the letters with a bit of white. A little washi tape and some color from a couple of Inktense Blocks. A few thoughts on what my word means to me, using my new fountain pen. And I’m calling this page done!  (click on image to enlarge)

1-1-15 Breathe

Happy New Year!

To ring in the New Year I have decided to start blogging again. Maybe not every day, but I’m hoping for at least once a week.  I’m taking several classes, so I should have plenty of art to share with you.

First up is the latest journal I made. I took an online class with Kelley Walker called Monoprint Bound. She taught us how to make prints with my absolute favorite tool, the Gelli Arts Gel Printing Plate, then make journals using some of those prints.  I made TONS of prints and then used some of them for the covers of my new journal. I used a variation of Kelley’s longstitch…because I already had pages punched with four holes and she used six. But I made it work! I hope you like it. (You can click on the images to enlarge them.)

Here’s the Front Cover…

1 Journal 1 - 2015  Outside Front

the whole outside of the journal, open….

2 Journal 1 - 2015  Outside

the back cover…

3 Journal 1 - 2015  Outside Back

inside front cover….

4 Journal 1 - 2015  Inside Front

and the inside back.

5 Journal 1 - 2015  Inside Back

I’m super happy with it. It’s always fun learning a new binding technique. I loved using my own prints for the covers. The little beady dangles on the spine really tickle my fancy!

Inspired and Working Small

I’ve been painting a little bit more lately. I’m working in another small journal that I made a while ago. It doesn’t have pre-painted pages but the smaller size doesn’t cause quite as much “white page syndrome!”  I have been inspired by teachers and members of The Documented Life Project (DLP). Either by their own art or actual tutorials, I’m learning lots of new things. Sometimes it’s something small, like smearing paint with an old credit card (the best use for them, as far as I’m concerned!), or something a little more complex, like the painted circles. (Click on images to enlarge.)

I painted the background of this page by spreading paint around with an old AAA card. A bonus is that since the paint is spread so thinly, it dries almost right away.

5-17-14 Live in the MOMENT

I LOVE making these painted circles! I learned how to do them from an online tutorial. A bunch of us doing the DLP are absolutely hooked on making them!

5-19-14

These cute little white tigers have blue eyes that match perfectly with my blue paint pen. So, naturally, they had to go on this page!

5-20-14

I’m starting to find a little more balance in my life. While I’m still doing a lot of reading, I am making time to create. Whether it’s working in my DLP planner or in a journal, it’s very fulfilling and gives me a real sense of accomplishment.

Eddie!

Last Friday night I went to see Eddie Izzard in Boston. He was BRILLIANT! Of course. He’s Eddie!

2014 Tour program - force majeure

Eddie is a British comic…the BEST, as far as I am concerned! It was the fourth time I’ve seen him perform live since I saw him on his “Circle” tour in March of 2000. Fortunately, one of my best friends is not only a fan but is not afraid to drive into Boston. That’s a major plus! A mutual friend of ours went with us last week for her second time. We had such a great time. We’ve been quoting lines from the show ever since.

I first saw Eddie when he performed his “Dress to Kill” show on HBO in 1999 and I was immediately hooked. I have every one of his recorded performances available in the US. Unfortunately, since our VHS died, we will either have to get our tapes converted to DVD or repurchase them on DVD. Not replacing them is NOT an option!

I hope you’ll check out some of his routines on YouTube. You just might find a new obsession!

Et voila!

Previous Older Entries